Thursday, February 23, 2017

A Little Serger Tip

I thought I'd do this short post in response to how many times I've seen this issue come up in classes.

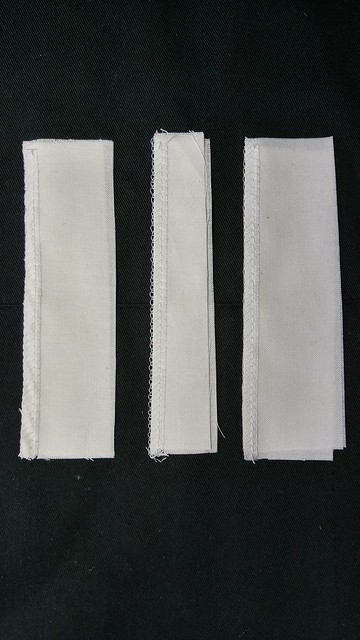
I took a picture of three different samples sewn on the same serger. The tension was set exactly the same on each one.
On the sample on the left, the edge of the fabric is curled. The sample in the middle, the looper threads go too far beyond the edge of the fabric. To correct both problems, I did not fiddle with looper tensions. I simply changed the width to which the fabric was cut. 
For the left one, I decreased the cutting width, which pulled the fabric away from the edge of the threads. For the middle one, I increased the width, which brought the fabric out to the edge of the threads.
I let the fabric determine for me, where to set the cutter. This is much easier than playing with tension. 
The sample on the right was easily achieved using this method.


Saturday, August 13, 2016

Sunday, April 24, 2016

Tonbo Bag

Yay!! I finally convinced Shelley to list her beautiful Tonbo Satchel pattern on Craftsy! http://www.craftsy.com/pattern/sewing/accessory/tonbo-a-japanese-style-satchel/203175?rceId=1461546275279~s7adsdxo  She has so many great projects and I hope she posts them all. She pays great attention to detail and gives excellent sewing machine instruction in each one.

We used this bag for our TopStitchers Club and  the techniques covered were, Sashiko, applique, perfect edge stitching, ruffling, corded pin tucks and zipper insertion without a zipper foot.


She includes fantastic close-ups of the fabric and foot placement.

I can hardly wait til she puts up her next one!!

Monday, February 15, 2016

Presser Foot Tips #1

It's a miserable wet day here and I am not very motivated to work on machines. Since I am reasonably caught up and you probably wouldn't want me to work on your machine when I'm not really into it, I thought I'd put some light on something that I see all the time. About 10 to 15% of the machines that I see for service, come in with the applique or embroidery foot on them. When I mention it to the client, they most often say, they want it on for the visibility it gives. I can understand that thought, but, the foot gives poor stitch results unless used for the purpose for which it was designed. Here is a pic of that style of foot.

You can see the hollowed out underside that was designed to allow a bead of satin stitching flow unimpeded. When you use these feet for normal sewing, this happens:

I hope this is seeable. As the needle pulls up, out of the fabric, it pulls the fabric up with it. That's because there is little or no downward support for the fabric. How that shows up as a problem can be seen here:

On the straight stitch, the knot isn't always in the center of the fabric and on the zig-zag, you can see the pucker. This is because the fabric is not properly supported under the foot.
In this picture:

You can see, when using the regular foot, whatever # or letter that happens to be for your machine, the straight stitch is perfect and the zig-zag did not pucker. Same thread, fabric and tension setting.
For full disclosure: Sewn on Shelley's B770 with Aurifil 50wt cotton, Sevenberries Cotton fabric, Organ HLx5 size 80/12 needle and all settings at default.


Sunday, November 29, 2015

How to maintain your Bernina walking foot

Shelley and I are enjoying a nice visit with her parents in Oregon and now that we are all done with the turkey it's time to post this, as promised.
Step 1: Lift the white plastic cover over the silver screw and slide off completely.
Step 2: Remove the two screws as indicated by pointers. Take the foot apart and remember where things were. Maybe take notes if unsure.

Step 3: Put a drop of sewing machine oil at the pivot as shown. At this point, check also that the springs are hooked up properly. Push down on the pivoting lever and make sure it is easily pulled back up by the spring.

Step 4: Gently pull out the forked lever and put a drop of oil in the opening, where indicated.

Step 5: Check that the silver bearings are turning properly. If they are not, the arm they are on may be bent. This can be gently bent back. If you are worried about doing this, then you need to take the walking foot to the shop to have it done. It won't work well if it is bent. Put a small amount of oil on the shaft of the bearings and wipe off the excess. I also put a small amount on top of the feed dogs where the bearings rest on them. Wipe off all excess, so no oil ends up on your project.

Step 6: Now turn the WF upside down and inspect for any damage. If there are any large pieces missing, the feed dogs can be replaced.
At this point you can start to reassemble the foot. If you have any questions please ask!
-- 
My thanks to Shelley for the use of her walking foot and the help with the pointers!


-- Edited on 11/29/15 at 1:40 PM --
Report This Post


Sunday, October 18, 2015

I have been unable to post for a very long time, because due to an email address that I dropped, I couldn't sign in here. That is resolved and I will start posting again. Thanks to those that have checked in! B

Thursday, August 15, 2013

What difference does a straight stitch plate make?

     In the photo, you will see three different needle plates. The one on the left is a straight plate, the middle is a 5.5 mm plate and the one on the right is a 9mm plate.
     When the tip of the needle tries to penetrate the fabric, it initially meets resistance and tries to push the fabric down into the opening of the needle plate. The bigger the opening, the more it is able to push the fabric. When the needle pulls back up, it then pulls the fabric back with it. This movement of the fabric can make it look like the tension is off. The position of the knot in the fabric will not be consistently in the middle. In extreme cases, it can cause skipped stitches. When you are sewing on very fine fabric or starting on  a corner, it can also cause the fabric to be chewed up.The tiny hole in the straight stitch plate prevents the fabric from being pushed down and will give you better stitching. Of course, choice of needle also plays a role, but the right plate sure helps.
     The thing to remember is that you will not be able to zig-zag or change needle position, or you will hear that crunching sound that means a broken needle. If you are fortunate enough to own a machine that lets you tell it what plate you are using, it's a feature to take advantage of.  
     Until next time, Bernie